
how to clean car engine oil leaks comes down to two priorities, keeping you safe around heat and chemicals, and cleaning in a way that helps you find the real source instead of hiding it.
Most people start cleaning because of smoke smell, a burning-oil odor, spots on the driveway, or a messy engine bay that makes every small seep look like a major problem. The catch is that a fast “degrease and rinse” can create new issues, like getting water into electrical connectors, swelling rubber, or washing oil into a storm drain.
This guide focuses on safe prep, smart product choices, and a cleaning process that supports diagnosis. You will also get a quick self-check to decide whether you should stop and have a shop handle it, because sometimes “cleaning” is the wrong first step.
Before You Clean: Safety and “Is It Safe to Drive?” Checks
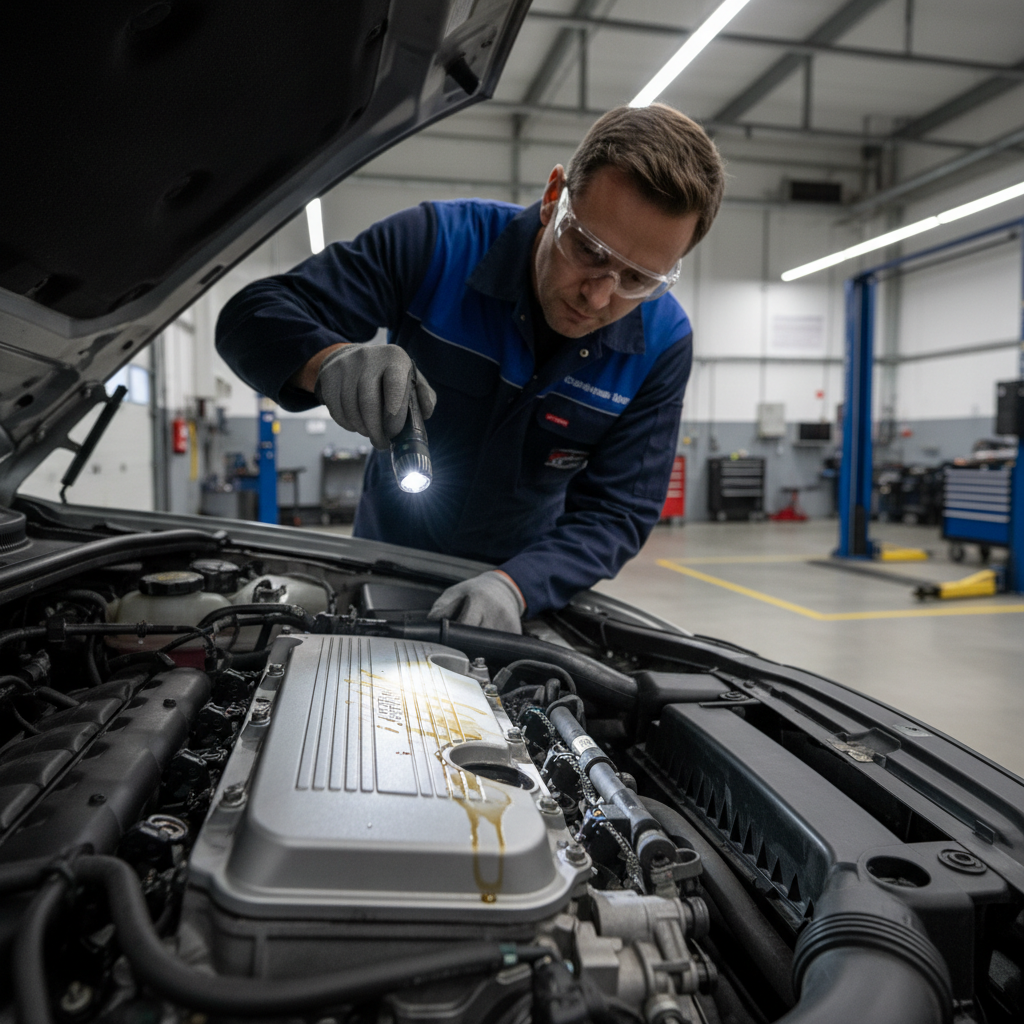
how to clean car engine oil leaks safely starts before any spray bottle, because hot parts and flammable vapors create most of the real risk.
- Let the engine cool fully, warm engines turn cleaners into fumes and can ignite some residues near the exhaust.
- Check for active dripping, if oil drips onto the exhaust manifold or downpipe, driving can mean smoke and, in rare cases, fire risk.
- Scan the ground, a small spot after parking might be seepage, a growing puddle suggests you should not keep driving.
- Look at the oil level with the dipstick, if it is low or dropping quickly, cleaning should wait until the leak gets addressed.
According to NHTSA, vehicle fires can start from mechanical failures or fluid leaks contacting hot surfaces, so treating “oil + heat” seriously is the right mindset even when the leak seems minor.
If you see heavy smoke, oil on the serpentine belt, or oil pooling around ignition coils, it is usually smarter to have a technician diagnose first, cleaning can spread contamination into places you do not want it.
Tools and Products: What Works Without Harming Components
The product choice matters more than people expect. Some strong solvents clean fast but can dry out rubber, discolor plastics, and strip protective coatings.
Recommended basics
- Nitrile gloves and safety glasses
- Absorbent pads or kitty litter for the floor
- Soft brushes, microfiber towels, paper shop towels
- Plastic bags and painter’s tape to cover sensitive parts
- A spray bottle of water or a gentle rinse method, ideally low pressure
Cleaner options at a glance
Use this as a practical chooser, not a strict rule, because label directions differ by brand.
| Cleaner type | Where it fits | Upsides | Watch-outs |
|---|---|---|---|
| Water-based engine degreaser | General engine bay grime | Usually safer on plastics and rubber | May need agitation, avoid soaking connectors |
| Citrus-based degreaser | Moderate oil film | Good cutting power, often lower odor | Can leave residue, rinse well, test on plastics |
| Brake cleaner (chlorinated or non-chlorinated) | Spot cleaning metal surfaces | Evaporates fast, great for small areas | Can harm plastics, strong fumes, flammable, use sparingly |
| Dish soap solution | Light film, final wipe | Cheap, gentle | Not for heavy buildup, still needs controlled rinse |
When in doubt, choose a water-based engine degreaser and do a small test spot on an inconspicuous plastic cover.
Find the Source First (So You Don’t Just Clean the Symptom)
If you only clean what you can see, you may miss the leak path. Oil runs downward and backward with airflow, so the mess is often far from the failure point.

Quick places to check before cleaning:
- Valve cover gasket area: oil wetness along the top edges, sometimes dripping onto exhaust heat shields.
- Oil filter and drain plug: fresh oil around the filter seal, or streaks starting at the pan bolt.
- Oil filler cap and PCV system: oil misting from pressure, messy but sometimes not a “gasket failure.”
- Front/rear main seal region: oil around the crank pulley or bellhousing area, harder to confirm without cleaning.
If the engine bay is coated, consider cleaning only a small “window” around the most likely source first. That keeps risk low and still improves diagnosis.
Step-by-Step: Cleaning an Engine Oil Leak Area Safely
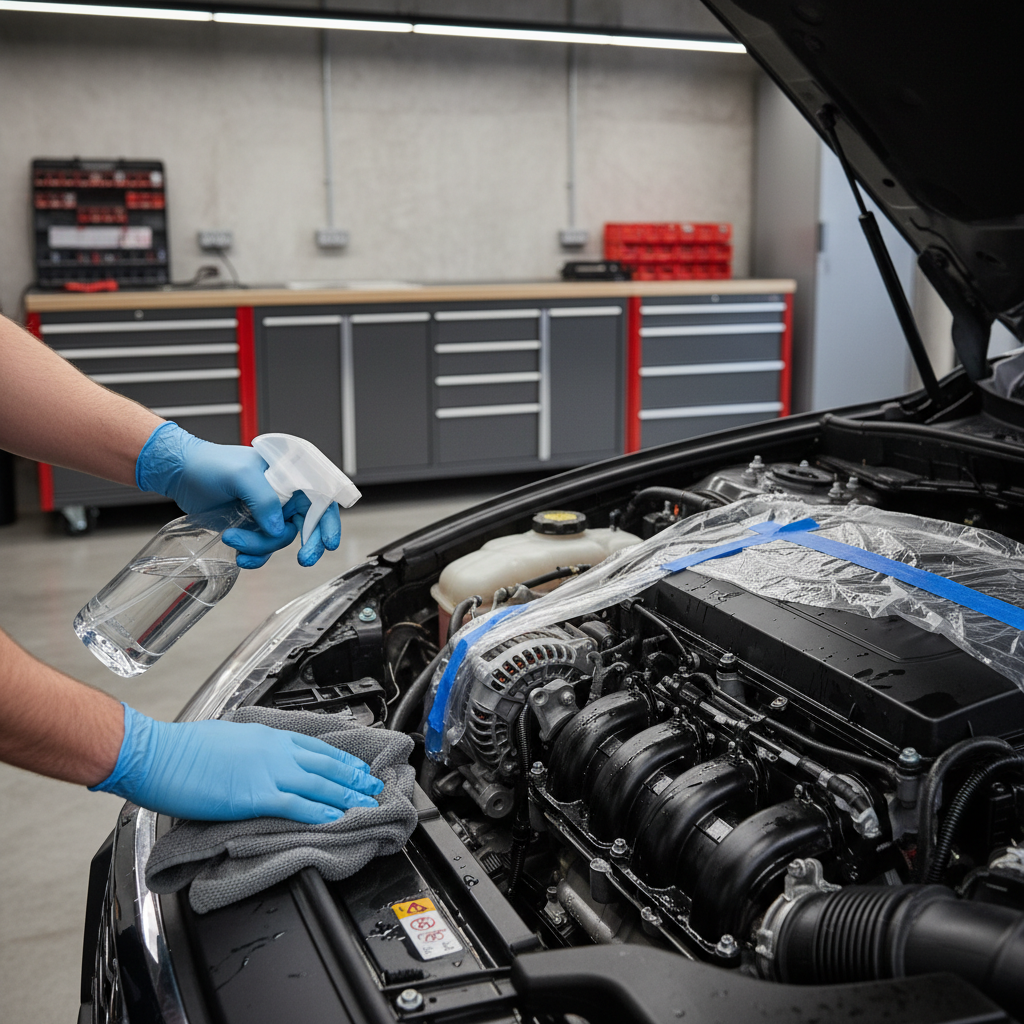
This process aims to be safe for modern engines that have lots of sensors and connectors. It also keeps runoff controlled, which matters for your driveway and local rules.
1) Prep the area
- Park on a flat surface, set the parking brake, and keep a fire extinguisher nearby if you have one.
- Put absorbent pads under the engine, especially under the suspected leak side.
- Cover sensitive components with plastic and tape: alternator openings, exposed intakes, fuse box seams, and any aftermarket wiring.
2) Dry remove the worst sludge
- Use towels to blot, not smear.
- Use a soft brush to lift thick grime, then wipe it away.
- Bag oily towels for proper disposal, many areas treat them as household hazardous waste.
3) Apply degreaser in controlled passes
- Spray on the metal surfaces first, avoid saturating electrical connectors.
- Let it dwell per label directions, but do not let it dry rock-hard on the surface.
- Agitate with a brush where the oil film persists.
4) Rinse carefully, low pressure
- A light mist or damp towel rinse is usually enough.
- If you must use a hose, use low pressure and keep water away from coils, connectors, and air intake paths.
- Capture runoff if possible, do not let oily water enter storm drains.
5) Dry and verify
- Remove covers, then dry with microfiber towels.
- Let the engine bay air dry, then start the engine and watch the cleaned area for fresh wetness.
- After a short drive, re-check with a flashlight, fresh oil has a distinct sheen compared with old residue.
According to EPA, used oil and oily runoff can harm waterways, so even a “small driveway cleanup” is worth doing with containment in mind.
Self-Test Checklist: What Kind of Leak Are You Dealing With?
Use this quick set of questions to decide whether cleaning is enough for now, or if it is time to plan a repair.
- Is oil level dropping between checks? If yes, treat it as more than cosmetic.
- Do you smell burning oil after driving? Often points to oil reaching hot exhaust parts.
- Is the leak active when idling? A fresh drip at idle can mean a pressurized leak, not just seepage.
- Is oil on belts or pulleys? Belt contamination can cause slipping and can fling oil everywhere.
- Is it actually oil? Some power steering fluid and ATF can look similar, confirm color and location.
If you keep cleaning the same area every week, you are doing maintenance work that a gasket or seal replacement might end for good.
Common Mistakes That Make Oil Leaks Worse
A lot of frustration comes from cleaning “harder” instead of cleaning “smarter.” These are the moves that tend to backfire.
- Pressure washing the engine bay: water can get forced into connectors and coil boots, misfires may show up days later.
- Using brake cleaner everywhere: great for metal spot work, but harsh on many plastics and rubber components.
- Cleaning a hot engine: fumes, burns, and quick evaporation that leaves residue behind.
- Ignoring PCV issues: excess crankcase pressure can push oil past seals, you clean forever until pressure gets addressed.
- Over-tightening the oil filter or drain plug: can damage threads or gaskets, and create new leaks.
Key takeaway: cleaning should reveal the leak path, not create a bigger mystery by spreading oil or introducing water into electronics.
When to Stop DIY and Get Professional Help
There is a point where how to clean car engine oil leaks is no longer the question, the question becomes how to prevent engine damage or safety issues.
- Oil hits the exhaust and smokes even after cleaning and re-checking.
- Rapid oil loss, or the low-oil warning comes on.
- Leak near timing cover or rear main area, repairs can be labor-heavy and misdiagnosis gets expensive.
- Oil inside spark plug wells, often valve cover gasket related, can cause misfires.
- You suspect multiple fluids, mixing coolant, oil, and ATF symptoms needs proper diagnosis.
A reputable shop can add UV dye and use a UV light to pinpoint the source with less guesswork, which often saves time compared with repeated clean-and-check cycles.
Practical Next Steps After Cleaning
Once the engine bay looks reasonable, keep it simple and track what matters.
- Check oil level every few days for two weeks, then weekly if stable.
- Place cardboard under the engine overnight to confirm drip size and location.
- Take two photos, one right after cleaning and one after a few drives, the comparison helps a mechanic if you end up scheduling service.
If the leak stays dry after cleaning, great, but keep an eye on it because some seepage only shows under highway heat and pressure.
Conclusion
how to clean car engine oil leaks safely is really about controlled cleaning, smart rinsing, and using the clean surface to confirm where oil returns. If you cool the engine, protect sensitive parts, use a mild degreaser, and verify after a short drive, you get a cleaner bay and a clearer answer.
If you want one action today, clean a small suspect area, then re-check after a drive, that single loop usually tells you whether you have a minor seep or a repair that needs planning.
FAQ
How do I clean oil off an engine without causing electrical problems?
Stick to a cool engine, cover the alternator and exposed connectors, and use low water. A damp towel rinse often works better than blasting water into tight spaces.
Can I use brake cleaner for engine oil leak cleanup?
For small metal-only spots, yes, it can be effective because it flashes off fast. Avoid spraying it broadly across plastics, rubber hoses, or painted covers, and ventilate well.
What if the oil leak is on the exhaust manifold area?
That is one of the more urgent scenarios because it can smoke and smell, sometimes heavily. Clean only after the engine cools, then try to identify the source above the manifold, if oil returns quickly, a shop inspection is usually the safer move.
Is it safe to drive with a small engine oil leak after I clean it?
Many small seepages are drivable for a while if oil level stays stable and there is no smoke, but you still want to monitor the dipstick and the cleaned area. If level drops or you see fresh drips, reduce driving and get it checked.
How can I tell if the fluid is engine oil or something else?
Engine oil is typically amber to dark brown and feels slippery, coolant feels more watery and often has color. Location helps too, oil near the filter or valve cover points one way, wetness near the radiator hoses points another.
Will degreaser damage engine paint or plastic covers?
Some products can dull finishes if they dry on the surface or if they are too aggressive. A quick test spot and following label dwell time reduces risk, and wiping rather than soaking is usually safer.
How often should I re-clean while diagnosing a leak?
Less than you think. Clean once, drive a short loop, and inspect; repeated full cleanings can smear evidence. If you cannot pinpoint it after one or two checks, UV dye diagnosis may be more efficient.
If you are dealing with repeated oil mess in the same spots, or you want a cleaner, safer process without trial-and-error, consider scheduling a leak inspection where a technician can confirm the source and recommend the right repair instead of just another cleanup.