
how to install roof rack on car is mostly about getting the fit right, tightening in the right order, and not rushing the “looks secure” part that later becomes wind noise or, worse, a loose load.
If you have a kayak, cargo box, bikes, or even just a weekend duffel that won’t fit comfortably, a roof rack can be a clean solution, but only when the rack matches your roof type and you mount it correctly. The tricky bit is that “roof rack” is not one universal thing, different cars use different attachment points, and the wrong assumptions can crack trim, dent sheet metal, or strip threads.
Below is a practical, car-owner-friendly walkthrough, with quick checks to confirm what you have, a step-by-step install flow, and the small details that usually separate a quiet, solid rack from one that keeps you nervous on the highway.
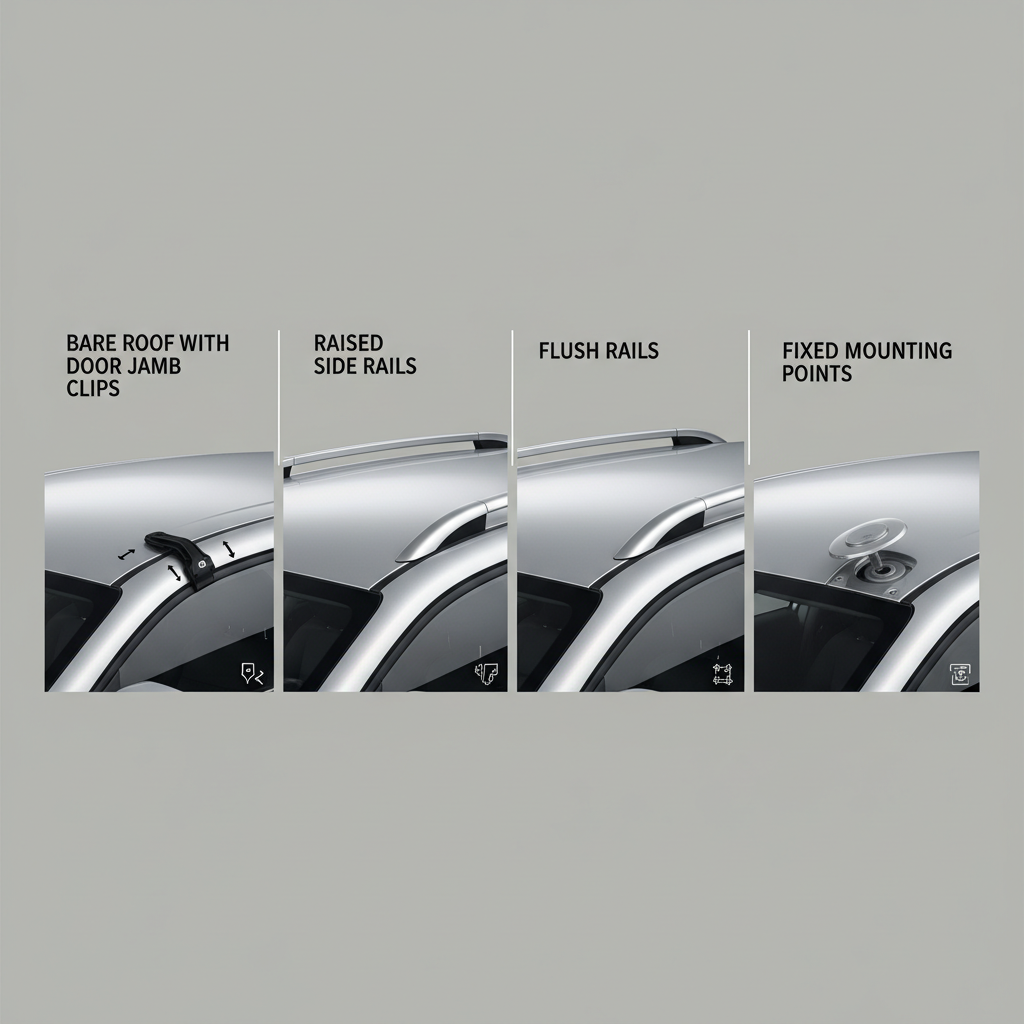
Identify your roof type before you buy or install
Before tools come out, you want to know how your car is designed to accept a rack. This determines the hardware, the clamping method, and where the load actually transfers into the body.
- Raised side rails: rails sit up off the roof with a gap underneath, crossbars clamp around them.
- Flush rails: rails hug the roof, crossbars usually clamp into a specific channel or use brand-specific feet.
- Fixed points: small covers or slots on the roof hide threaded mounting points.
- Bare roof (no rails): crossbars clamp at the door jamb using clips and pads, fit is very vehicle-specific.
According to NHTSA, improperly secured loads can create road hazards, so treating “fitment” as the first safety step is not overkill, it’s the whole game.
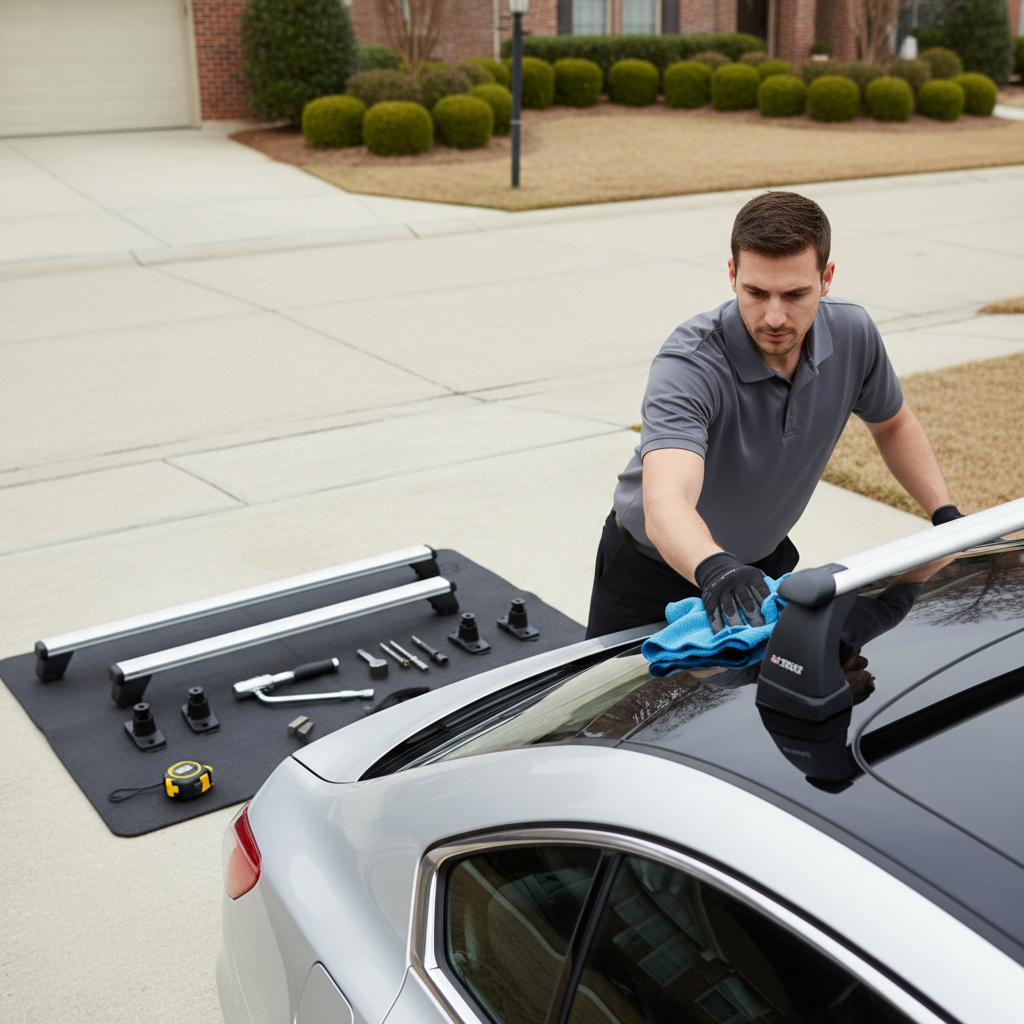
Tools and prep: what to gather and what to clean
You usually don’t need a garage full of gear, but you do need the right basics. If your kit includes a torque tool, use it, overtightening is a common way people damage roofs or strip fasteners.
- Rack kit (crossbars, feet/towers, clips or bolts, end caps)
- Tape measure (or the brand’s bar spacing guide)
- Torque wrench or the included torque key
- Step stool (safer than standing on door sills)
- Microfiber cloth, mild soap and water
- Painter’s tape (optional, helps mark positions)
Clean the roof and the door jamb area where pads or clips touch. Grit under a pad can scuff paint, and dirt around a fixed-point cover can fall into threads when you open it.
One more prep note that matters: remove any old wax buildup where pads sit. A slick surface can let feet shift before you fully torque.
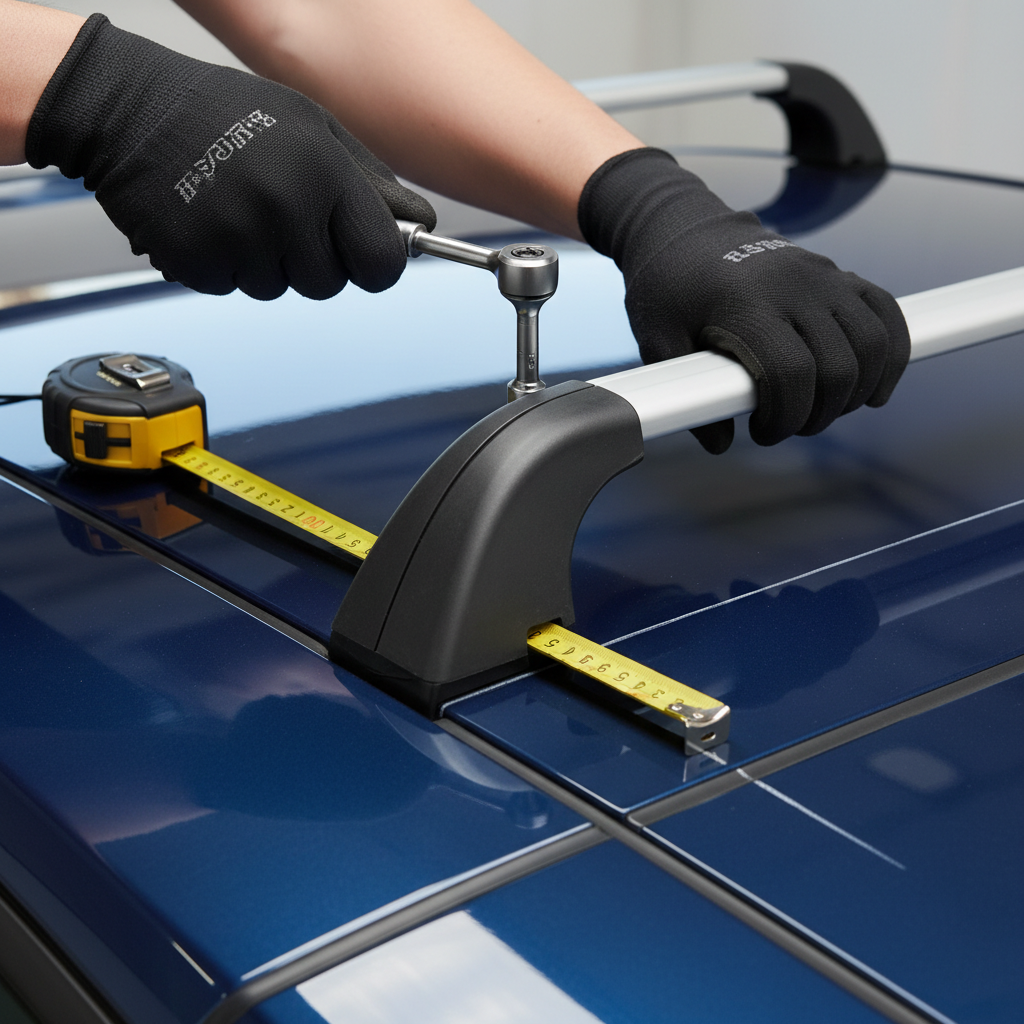
Fitment basics: spacing, overhang, and where people mess up
Most installation issues start with bar placement. You can mount a rack “straight,” yet still end up with a whistle at 45 mph, a cargo box that hits the hatch, or clamps sitting on the wrong curve of the roof.
- Bar spacing: follow your rack brand’s recommended distance, many accessories require a minimum spread to be stable.
- Bar overhang: keep left/right overhang equal, too much overhang can be a head-bumper and may stress the bar.
- Rear hatch clearance: test open the hatch slowly before final torque, especially with SUVs and hatchbacks.
- Wind direction: if your front bar has an airfoil shape, make sure it faces the correct direction.
If you’re learning how to install roof rack on car for the first time, don’t rely on “eyeballing” alone, measure side-to-side from the windshield seam or door frame reference points so the bars end up square.
Step-by-step: installing crossbars on common roof setups
The exact hardware varies by brand, but the workflow stays similar: set positions, seat pads, lightly tighten, align, then torque evenly.
Option A: Raised rails
- Place front bar on the rails at the recommended forward position.
- Center the bar, confirm equal overhang.
- Tighten the rail clamps until snug, then alternate left/right to keep even pressure.
- Repeat for rear bar using the required bar spread.
Option B: Flush rails
- Confirm the feet are the correct model for your vehicle and rail profile.
- Seat each foot fully on the rail channel, partial engagement can slip under load.
- Snug all fasteners first, then align the bars square to the car.
- Torque to the kit spec.
Option C: Fixed points
- Open the fixed-point covers carefully, avoid snapping the plastic tabs.
- Start bolts by hand to prevent cross-threading.
- Tighten in small increments, alternating sides.
- Install trim pieces or caps per instructions to keep water out.
Option D: Bare roof with door jamb clips
- Assemble feet and clips loosely so you still have adjustment.
- Set the bar on the roof at the specified measurement from the windshield line.
- Hook clips into the door frame exactly where the instructions show, then close doors gently to confirm clearance.
- Snug each side until the pads fully seat, then torque gradually and evenly.
With clip-based systems, it’s normal to feel uncertain the first time. What you want is solid pad contact, correct clip placement, and torque at spec, not “as tight as humanly possible.”
Quick compatibility table: match rack type to your use
Choosing the right setup makes installation easier and reduces noise and re-tightening later. Use this as a practical shortcut.
| What you carry | Typical rack/accessory fit | What to watch for |
|---|---|---|
| Roof box / luggage | Aero crossbars + cargo box | Rear hatch clearance, bar spread requirements |
| Kayak / SUP | Crossbars + J-cradles or saddles | Bow/stern tie-down points, strap routing |
| Bikes | Crossbars + fork-mount or upright trays | Garage height, front wheel removal needs |
| Lumber / long items | Crossbars + load stops | Weight limits, shifting, extra tie-downs |
If you’re trying how to install roof rack on car for a cargo box specifically, confirm the box’s clamp style matches your bar shape, some older boxes dislike very wide aero bars unless an adapter is used.
Safety checks before your first drive (and after)
Think of this as the “trust but verify” stage. Many racks settle slightly after the first few miles, especially clip-based setups and new rubber pads.
- Shake test: grab each bar near a foot and shake side-to-side, it should feel like part of the car, not a separate object.
- Torque confirmation: re-check torque values after initial alignment.
- Door/hatch test: open and close all doors and the hatch slowly, listening for rubbing.
- Accessory fit: mount your box/bike tray once, verify clamps fully engage and don’t bottom out.
- First-trip recheck: stop after 15–30 minutes of driving, re-tighten if the manufacturer recommends it.
Key takeaways: correct fitment beats brute force, torque matters, and a short recheck drive often prevents the “why is this suddenly noisy?” moment later.
Common mistakes and how to avoid them
- Mixing parts across kits: towers, clips, and pads look similar, but small differences change fit and safety.
- Ignoring weight ratings: keep within the vehicle roof limit and the rack limit, and remember dynamic ratings differ from “parked” loads.
- Mounting too far forward: can create wind noise and reduce clearance for accessories, follow the measurement guide.
- Uneven tightening: can twist bars, stress feet, and create gaps that whistle.
- Leaving it on forever: many people do, but if you don’t need it daily, removing crossbars can reduce noise and sometimes improve fuel economy.
According to AAA, carrying cargo on the roof affects vehicle handling and stopping distance, so drive more conservatively with extra weight up top, especially in crosswinds.
When it makes sense to get help from a shop
If anything about the attachment points feels off, stop and ask. A quick install check often costs less than replacing weatherstripping, repainting scuffed roof edges, or dealing with a failed mount on a trip.
- You see exposed airbags or wiring near where clips might sit, which can happen around some door frames.
- Fixed-point bolts won’t thread smoothly by hand, cross-threading risk is real.
- You’re mounting a rooftop tent or heavier gear, weight limits and reinforcement questions come up fast, and a professional opinion may help.
- You have a panoramic glass roof, fitment is sometimes more restrictive and brand guidance matters.
If you’re unsure about how to install roof rack on car with your exact model year and roof trim, contacting the rack manufacturer support or a reputable local rack shop is usually the most efficient next step.
Practical install tips that make the setup quieter and easier to live with
- Mark bar positions with small pieces of painter’s tape after you find the quiet spot, reinstalling becomes faster.
- Lock cores help with theft deterrence, but don’t treat them as a guarantee.
- Strap discipline: twist straps once or twice to reduce humming, tuck loose ends.
- Height reminder: add a note on your dash when carrying bikes or a box, garages and drive-thrus become a risk.
Most people can get a clean install in under an hour if the kit is correct, the car is prepped, and measurements are followed instead of guessed.
Conclusion: a secure rack is a measured rack
how to install roof rack on car comes down to three habits: confirm roof type and fitment, measure and align before torque, then re-check after the first drive. Do those, and the rack stops feeling like a gamble and starts feeling like a reliable part of your carry system.
If you’re installing this for a trip, do a short test drive the day before, not in the parking lot five minutes before departure, you’ll catch noise, clearance issues, and loose hardware while it’s still easy to fix.
FAQ
Do I need a torque wrench to install a roof rack?
Often it’s strongly recommended. Many kits include a torque-limiting tool for a reason, overtightening can damage the roof or hardware, while undertightening can allow movement.
How do I know if my car has fixed mounting points?
Look for small covers or marked locations on the roofline, sometimes near the door openings. Your owner’s manual or the rack brand fit guide usually confirms this without guessing.
Why is my roof rack making a whistling noise?
Common causes include bars installed backwards, bars too far forward, or missing rubber strips in the crossbar T-slot. Small alignment changes can make a big difference.
Can I install a roof rack on a car with a sunroof or panoramic roof?
Many vehicles can, but restrictions vary. You’ll want to verify approved rack positions and accessory clearance, and if anything contacts glass or trim, pause and seek guidance.
How often should I re-tighten the rack?
A good rule is to re-check after the first short drive and then periodically, especially before long trips, after heavy rain, or when temperatures swing. Always follow the manufacturer’s instructions if they specify an interval.
What is the weight limit for a roof rack?
It’s limited by both the vehicle roof rating and the rack rating, and the lower number wins. If you’re unsure, check your owner’s manual and the rack documentation, and consider professional advice for heavier loads.
Is it okay to leave crossbars on all year?
Usually yes, but expect more wind noise and some efficiency loss. If you rarely use them, removing them can reduce wear on pads and keep things quieter.
Do clip-on racks damage paint?
They can if installed on a dirty surface or if pads shift. Cleaning contact areas and torquing evenly tends to minimize marks, and periodic inspection helps catch movement early.
If you’re installing a rack for the first time and you want a more confidence-inspiring setup, it can help to share your vehicle year/make/model, roof type, and what you plan to carry, then match the kit and bar spacing before you buy extra accessories.