
How to repair small car windshield chip at home usually comes down to one thing: stopping a tiny blemish from turning into a long crack that forces a full windshield replacement.
If the chip is fresh and small, a DIY resin kit can often make it far less visible and help restore strength in that spot, but the window for easy success is shorter than most people think, dirt and moisture get in fast.
This guide walks you through how to judge the chip, what tools matter, the exact step-by-step repair process, plus the common mistakes that make “DIY” fail.

When a DIY windshield chip repair makes sense (and when it does not)
Before you open a kit, decide whether this is a “repair” job or a “replace it” situation, because resin only works well on certain chip types.
- Good DIY candidates: small bullseye chips, small star breaks, and tight chips that are roughly smaller than a dime, located away from the edge.
- Usually not worth DIY: long cracks, chips that reach the edge, damage in the driver’s primary viewing area where distortion would bother you, or chips with visible contamination you can’t clear.
- Safety note: if you suspect the windshield has multiple layers compromised or the crack is spreading quickly, consider professional help, visibility and structural integrity can be affected.
According to the National Highway Traffic Safety Administration (NHTSA), the windshield is a critical safety component that supports the roof in a rollover and helps airbags deploy properly, so if you’re unsure, err on the cautious side and ask a pro to assess it.
Quick self-check: is your chip “small enough” to repair at home?
People often judge by size only, but location and age matter just as much.
- Size: chip smaller than about 1 inch across, with cracks radiating less than a couple inches.
- Location: at least a few inches away from the windshield edge and not directly in your line of sight.
- Freshness: ideally repaired the same day, older chips can trap moisture, car wash residue, and road grime.
- Weather: moderate temps help, extreme heat can thin resin, cold can slow curing.
If you check most boxes, how to repair small car windshield chip at home is a realistic plan, if not, the time and money may be better spent on a shop repair.
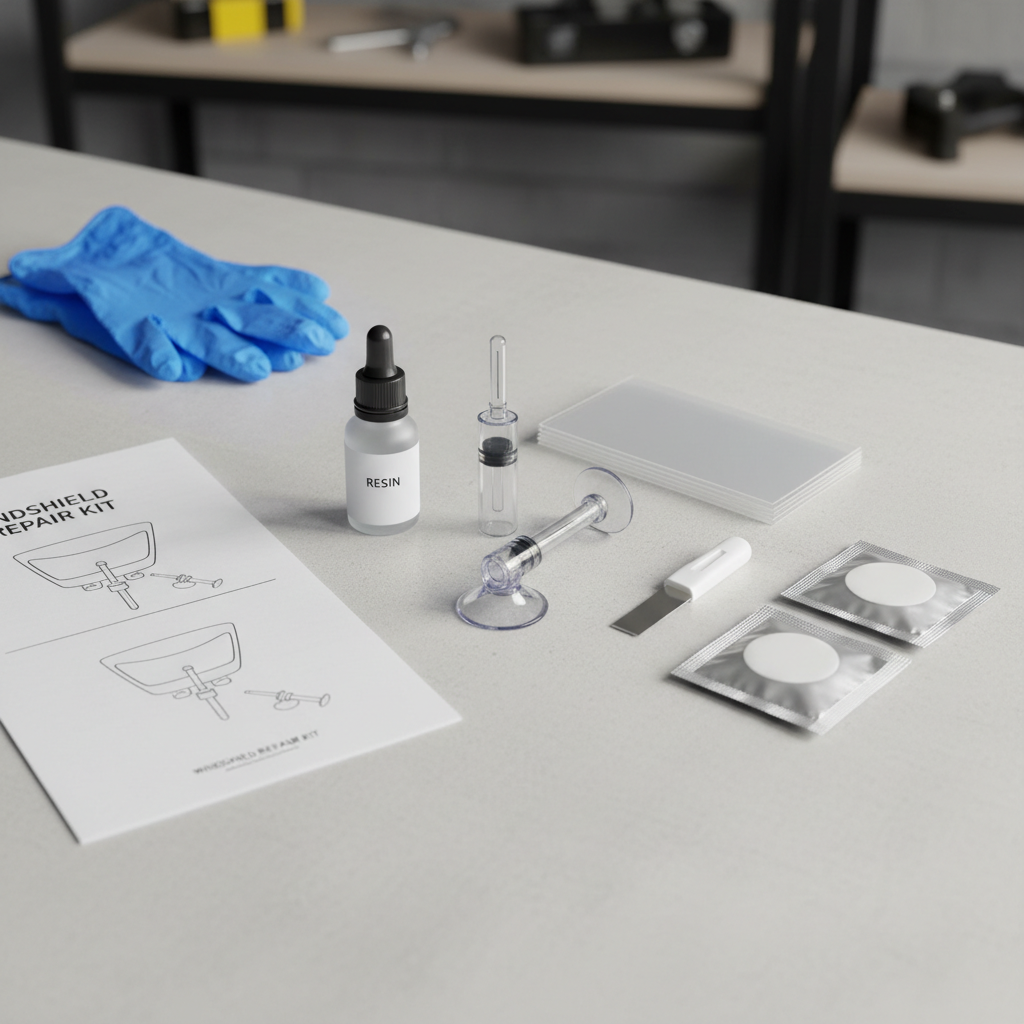
What you need: tools, kit types, and a realistic cost comparison
Most DIY kits are “resin + injector + curing film.” The injector matters more than the brand name, it helps push resin into the break and pull air out.
Basic supplies
- Windshield repair kit (resin + injector bridge + curing strips/film)
- Glass cleaner (ammonia-free is safer for trims)
- Isopropyl alcohol wipes or a clean lint-free cloth
- Razor blade (usually included) for scraping cured resin flush
- Shade or a garage spot, plus sunlight or a UV curing light depending on kit
DIY vs pro: what people typically trade off
| Option | Typical upside | Common downside |
|---|---|---|
| DIY resin kit | Low cost, same-day fix, good for small chips | More visible than pro in many cases, easy to trap bubbles if rushed |
| Professional chip repair | Better vacuum/pressure tools, cleaner finish, warranty sometimes | Costs more, scheduling, may still be visible depending on chip |
| Windshield replacement | Restores optical clarity, solves cracks and edge damage | Most expensive, ADAS recalibration may be needed on newer cars |
Key point: DIY repair is about preventing spread and improving appearance, it rarely makes the chip “disappear.”
Step-by-step: how to repair a small windshield chip at home
Clean work and patience are the difference between a solid repair and a cloudy blob.
1) Stabilize and protect the chip right away
- Park in shade if possible, avoid blasting the defroster straight onto the chip.
- If you must drive before repair, cover the chip with clear tape to keep dirt and water out, remove it before you start.
2) Clean the glass properly (without pushing grime into the break)
- Clean the area around the chip, then wipe with isopropyl alcohol.
- Do not flood the chip with cleaner, extra liquid can seep in and interfere with resin bonding.
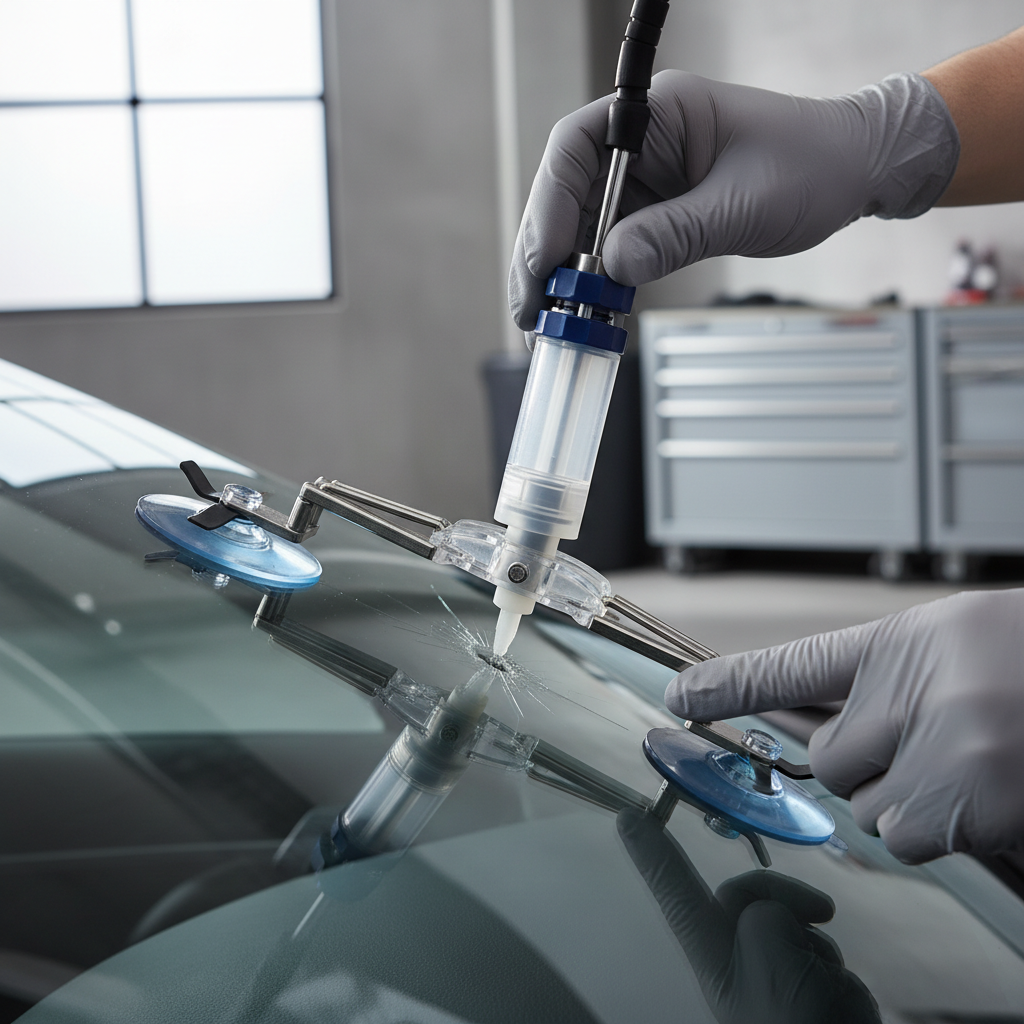
3) Set the injector bridge and create a good seal
- Center the injector tip directly over the impact point.
- Press the bridge evenly so it seals flat on the windshield, a tilted bridge often causes leaks and bubbles.
4) Run vacuum/pressure cycles (the part most DIYers rush)
- Follow your kit’s directions, but the general idea is: pull air out, then push resin in.
- If you see stubborn bubbles, lightly tap the glass near the chip with a tool handle, gentle vibration can help air rise.
5) Cure the resin and level the surface
- Apply the curing film/strip and add a drop of pit filler resin if your kit includes it.
- Cure in direct sunlight or with a UV lamp for the recommended time.
- Remove the film and scrape the cured resin flush with a razor blade held at a low angle.
Practical expectation: after a correct repair, you’ll often still see a faint mark, but it should look “sealed” rather than sharp and white.
Common mistakes that make DIY chip repairs fail
If you tried before and it looked worse, it’s usually one of these, not “bad luck.”
- Waiting too long: moisture and dust create hazing and prevent resin penetration.
- Repairing in extreme temperatures: resin viscosity and curing speed change, results get inconsistent.
- Skipping vacuum time: trapped air shows up as silvery spots.
- Over-tightening the injector: can spread micro-cracks, especially in star breaks.
- Using household glass adhesives: super glue and random epoxies often cure cloudy and can complicate a later professional repair.
If you’re focused on how to repair small car windshield chip at home, think “clean, sealed, cured,” not “fast.”
Aftercare: what to do in the next 48 hours
Most resins stabilize quickly, but the first day still matters.
- Avoid high-pressure car washes for about 24 hours, many kits recommend this to prevent edge lifting.
- Go easy on extreme temperature swings, for example full heat defrost on high right away.
- Check the chip in different lighting, if you see a growing line, stop driving aggressively and consider a shop inspection.
When you should stop DIY and talk to a professional
Some chips look small but behave like cracks-in-waiting, especially near edges where the glass flexes more.
- Cracks radiating longer than a few inches, or any crack that continues to grow day to day
- Damage within the driver’s primary viewing area where any distortion is distracting
- Chips that look dirty inside, or that have been through rain, snow, or multiple washes
- Vehicles with ADAS cameras and sensors near the rearview mirror, you may need calibration if replacement becomes necessary
According to the Insurance Institute for Highway Safety (IIHS), advanced driver assistance features depend on correctly functioning sensors and cameras, so if the damage or repair affects that area, getting a professional opinion is a reasonable step.
Conclusion: a small chip is fixable, but only if you treat it like a time-sensitive repair
If you catch the damage early, keep it clean, and use the injector cycles patiently, how to repair small car windshield chip at home is very doable for many small chips. If the chip sits near the edge, spreads, or sits right in your sightline, that’s where DIY often becomes a false economy.
Two simple next moves: tape the chip today if you can’t repair immediately, then either do the resin repair in stable conditions or book a pro repair before temperature swings turn it into a crack.
FAQ
How long does a DIY windshield chip repair take?
Many kits claim fast results, but in real life you should plan for 30–60 minutes including cleaning, injector cycling, and curing time, rushing usually shows up as bubbles or haze.
Will the chip disappear completely after I repair it at home?
Usually not, a good repair tends to look like a faint spot rather than a bright, sharp chip, the main goal is sealing the break and slowing future spreading.
Can I repair a windshield chip in cold weather?
You can, but it gets trickier, resin thickens and curing slows. If you must do it, working in a garage and letting the glass warm up gently often helps, avoid blasting high heat directly at the chip.
Is it safe to drive right after the repair?
Once the resin fully cures and you scrape it smooth, it’s typically fine for normal driving, but if you notice any spreading lines or distortion, consider having it inspected.
What if my chip is near the edge of the windshield?
Edge damage tends to spread more because that area flexes and has stress concentration. Many cases are better handled by a professional, and sometimes replacement is the safer call.
Do I need a UV light to cure the resin?
Some kits are designed to cure in direct sunlight, others work better with a UV lamp. If you live in a cloudy area or you’re repairing indoors, a small UV light can make curing more consistent.
Can I use super glue or epoxy instead of a repair kit?
It’s tempting, but those products often cure cloudy and don’t flow into micro-cracks the same way windshield resin does, they can also make later professional repair harder.
If you’re trying to save time and want a more predictable finish, a quick professional chip repair can be a practical option, and if you’re unsure whether your damage is still “chip territory,” a shop assessment may save you from paying for replacement later.