
how to replace car headlight bulb hid is usually less about “changing a bulb” and more about working around an HID conversion kit, tight access behind the housing, and wiring that may or may not match your car’s original setup.
If your headlight flickers, one side goes out, or you see a color shift that looks wrong, you can often fix it at home, but only if you identify what actually failed: the bulb, ballast, igniter, ground, or a loose connection. Guessing wastes time and can cook a new bulb fast.
This guide walks you through the checks that matter, the safest way to swap an HID bulb in a converted setup, and the little details people miss, like not touching the glass and not forcing the bulb tab alignment.
Quick safety note: HID systems use high voltage during start-up, so treat the wiring with respect. If anything looks melted, corroded, or hacked together, calling a qualified technician often saves money.
Before you start: what “HID conversion” changes
On a factory halogen headlight, power goes straight to a simple filament bulb. With an HID conversion, the system usually adds a ballast to regulate power and an igniter to start the arc inside the bulb. Those extra parts create extra failure points.
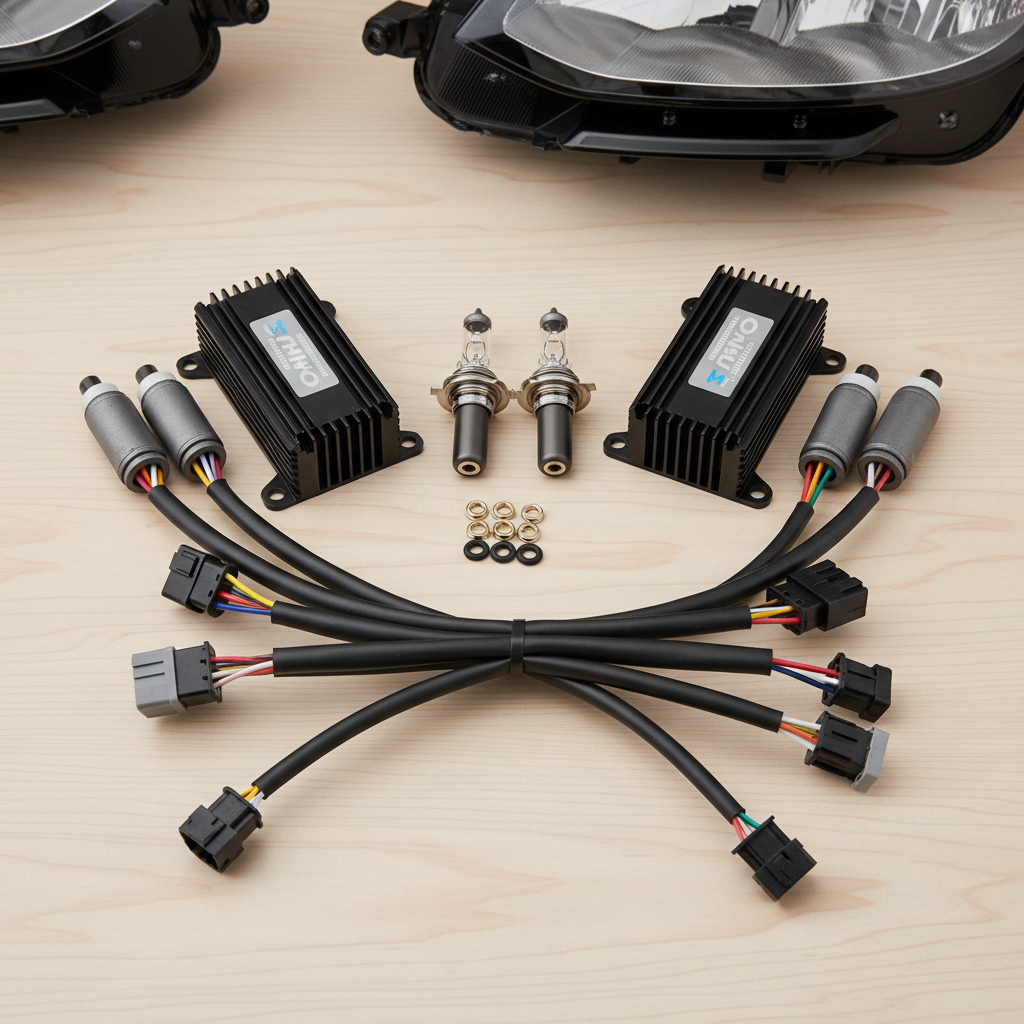
- HID bulb: the light source (common types include H1, H7, 9005, 9006, H11, etc.)
- Ballast: converts vehicle power to what the HID needs
- Igniter: provides the high-voltage pulse to start the lamp (sometimes built into the ballast)
- Adapters/dust caps: used to fit HID bulbs into halogen housings
According to NHTSA, headlamps are regulated safety equipment, and modifications can create glare or noncompliant output if the housing optics do not match the light source. That does not mean you cannot troubleshoot your current setup, but it does mean you should be realistic about beam pattern and safety.
Tools, supplies, and a realistic time estimate
Most replacements take 30–90 minutes per side, depending on access. Some cars require removing the bumper or headlight assembly, which turns a “bulb job” into an afternoon.
What to gather
- Nitrile gloves or clean latex gloves
- Isopropyl alcohol and a lint-free cloth (in case you touch the bulb)
- Basic sockets/screwdrivers
- Plastic trim tools (helpful if bumper clips are involved)
- Zip ties and dielectric grease (optional, for tidier, more reliable connections)
- Your correct replacement HID bulb pair (recommended to replace in pairs)
Key point: Buy the exact bulb base type your conversion uses, not just what the original halogen bulb was. Many conversions adapt one base to another, and that mismatch is where returns and headaches come from.
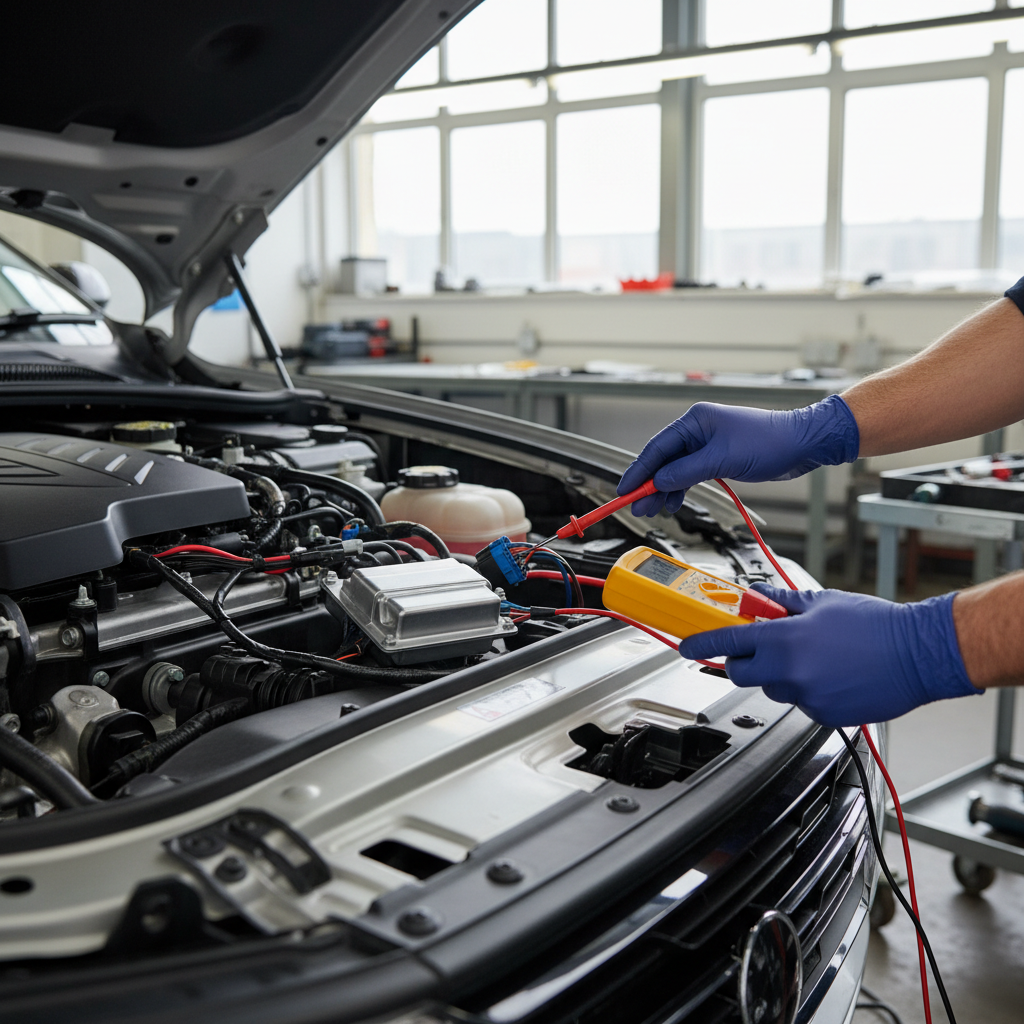
Fast diagnosis: is it the bulb, ballast, or wiring?
Before you open anything up, do a quick test. Most “dead headlight” complaints on HID conversions are intermittent connections, a failing ballast, or a bulb at end of life, not a fuse.
Quick self-check checklist
- Swap left/right components: If the problem follows the bulb, the bulb is likely bad. If it follows the ballast, suspect the ballast/igniter.
- Look for flicker at start-up: Rapid flicker often points to ballast, poor ground, or weak power delivery.
- Color shift (pink/purple or very uneven color side-to-side): common sign of an aging HID bulb.
- Moisture inside housing: can shorten bulb life and corrode connectors, fix the seal first.
- Burnt smell or melted connector: stop and inspect wiring, replacement parts may be required.
If swapping components feels like too much disassembly, you can still inspect connectors. Many conversions fail because a spade connector loosens, a ground point rusts, or a ballast is zip-tied near high heat.
Step-by-step: how to replace the HID bulb in a conversion kit
This is the practical workflow that avoids most mistakes. You may not need every step, but skipping the safety parts is where people get surprised.
1) Power down and make it safe
- Turn lights off, remove key, and wait a few minutes for capacitors in the ballast to discharge.
- If your kit wiring looks questionable, disconnect the negative battery terminal to reduce risk.
2) Access the rear of the headlight
- Open the hood and locate the back of the headlight housing.
- Remove the dust cap or access cover. Some conversions use an aftermarket cap with a grommet.
- If access is tight, check whether the airbox, battery cover, or washer reservoir can be moved without fully removing the headlamp.
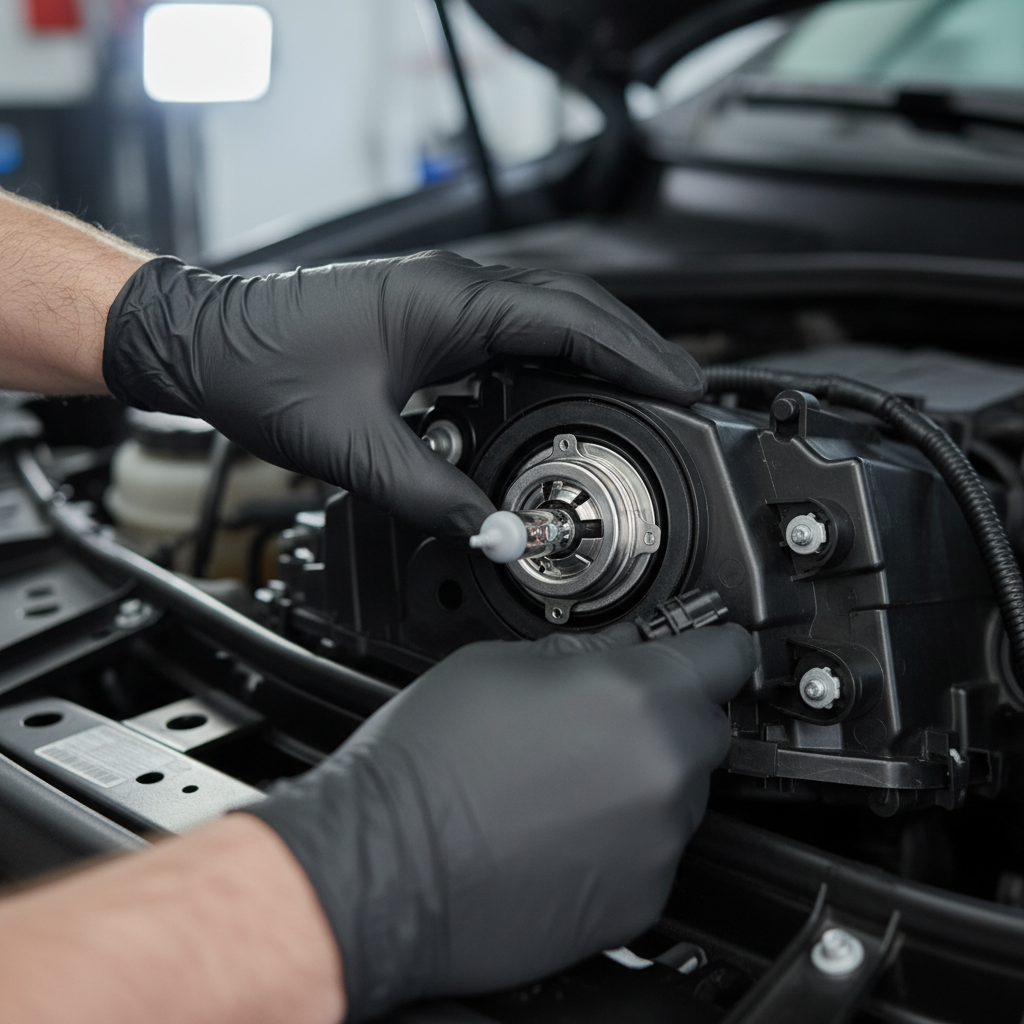
3) Disconnect HID connectors correctly
- Unplug the bulb connector and igniter connector gently, do not yank on wires.
- Note orientation and routing, a quick phone photo helps when reassembling.
4) Remove the bulb retaining clip or lock ring
- Release the spring clip or twist the lock ring, depending on housing design.
- Pull the HID bulb straight out, avoid banging the arc tube against the reflector.
5) Install the new HID bulb without contaminating it
- Wear gloves, handle by the base.
- Align tabs carefully, if it does not seat easily, stop and re-check alignment.
- If you accidentally touch the glass, clean with isopropyl alcohol and let it dry before powering on.
6) Reconnect, seal, and secure
- Reconnect plugs firmly until they click or feel fully seated.
- Reinstall dust cap and ensure the grommet seals, poor sealing invites condensation.
- Secure the ballast away from high heat and moving parts, with proper mounting if possible.
7) Test before fully reassembling
- Turn headlights on and confirm quick ignition, steady light, and matching color side-to-side.
- If one side does not fire, swap the new bulb to the other side before blaming the bulb.
Practical tip: If your kit uses separate igniters, reseating that connection fixes a surprising number of “new bulb won’t turn on” moments.
Compatibility and performance checks (the stuff that prevents glare)
Replacing parts is one thing, but HID conversions often disappoint because the beam pattern is wrong, not because the bulb is “bad.” If you are already in there, it is worth checking alignment and housing type.
- Projector vs reflector: HID in reflectors can create uncontrolled glare in many cases, projectors tend to manage light better.
- Color temperature: 4300K–5000K typically looks brightest on-road, higher Kelvin ratings often look bluer but not necessarily more usable.
- Bulb type match: D2S/D2R bulbs belong in HID projectors/reflectors designed for them, while “H11 HID” conversion bulbs are a different animal.
According to FMCSA, proper headlamp aim matters for seeing distance and glare control, especially on public roads. Even a small misalignment can make an otherwise “working” setup feel unsafe at night.
Common mistakes that cause repeat failures
Most repeat problems are not bad luck, they are installation details that feel minor until they are not.
- Touching the bulb glass: oils can create hot spots and shorten life.
- Ignoring moisture: condensation corrodes connectors and stresses ballasts.
- Ballast mounted near exhaust: heat can cook electronics over time.
- Loose ground: flicker, delayed start, and random shutoff become common.
- Replacing only one side: color mismatch and uneven brightness are typical.
If you keep burning bulbs quickly, it is worth suspecting voltage instability, poor-quality ballasts, or incorrect bulb fit causing vibration. Sometimes the “fix” is improving the wiring harness or rethinking the conversion.
Decision guide: replace the bulb, the ballast, or upgrade the whole setup?
Here is a simple table to keep you from buying parts twice. It is not perfect, but it matches what usually happens in the real world.
| Symptom | Most likely cause | What to try first |
|---|---|---|
| One side out, other side fine | Bulb or ballast on that side | Swap bulbs left/right, then swap ballasts |
| Flicker when driving over bumps | Loose connector, weak ground | Reseat connectors, clean/tighten ground point |
| Slow warm-up, color turns pink/purple | Aging bulb | Replace both bulbs as a pair |
| Both headlights out after rain | Moisture intrusion, short or corrosion | Dry housing, fix seal, inspect harness/ballasts |
| New bulb will not ignite | Igniter/ballast issue, polarity, connector mismatch | Check connectors, test old bulb on that side, verify kit polarity |
When to stop DIY and get professional help
Some situations are not worth pushing through in your driveway, mostly because the risk is higher than the savings.
- Repeated fuse blowing, melted insulation, or visible arcing
- Headlight assembly removal requires bumper removal and you are not comfortable with clips and alignment
- Beam pattern creates obvious glare or you cannot aim the lights correctly
- You suspect a vehicle-side electrical problem (body control module, voltage regulation)
Many shops can diagnose an HID conversion quickly by testing power, grounds, and swapping known-good parts. If you are unsure, asking a professional is a reasonable call, especially since headlamps affect safety for everyone on the road.
Conclusion: a clean replacement beats a quick swap
Most people searching how to replace car headlight bulb hid are dealing with a conversion kit that adds complexity, so the win is simple: confirm what failed, replace parts carefully, and seal everything so moisture and heat do not undo your work a month later.
If you want one action step, do the left-right swap test before buying parts, then replace bulbs as a pair if they are aging. If the setup keeps acting up, it may be time to improve mounting, grounds, or consider a different lighting approach that better matches your housing.
Key takeaways
- Diagnose first, many HID “bulb failures” are ballast or connection issues.
- Do not touch the glass, and confirm the bulb seats perfectly.
- Seal the housing, moisture is a repeat-failure machine.
- Aim matters, even bright lights can be unsafe if misaligned.
FAQ
How do I know which HID bulb my conversion uses?
Check the bulb base and the kit packaging if you still have it, because the original halogen size is not always the final HID bulb type. If you cannot tell, pull the bulb and match the connector and locking tabs to a known type.
Can I replace just one HID bulb?
You can, but many conversions show obvious color mismatch when one bulb is new and the other is aged. In many cases, replacing both keeps output and color consistent, and it reduces the odds of doing the job twice.
Why does my HID headlight flicker after replacing the bulb?
Flicker often points to ballast health, a weak ground, or a connector that is not fully seated. It can also happen if the kit draws power through thin factory wiring without a relay harness, though that varies by vehicle and kit design.
Is it normal for HID bulbs to look different colors left vs right?
A small difference can happen, but a noticeable mismatch usually means one bulb is older or a ballast is driving differently. If the “odd” side looks pink or purple, that is a classic end-of-life sign for many HID bulbs.
Do I need to disconnect the battery to replace an HID bulb?
It is not always required, but it is a safe move if you are unsure about the kit wiring or if you will touch multiple connectors. HID systems can generate high voltage at start-up, so erring on the cautious side is smart.
My new HID bulb will not turn on, what should I check first?
Start with the simple stuff: connector seating, polarity if your kit allows it, and whether the igniter connection is fully locked. Then swap the new bulb to the working side to confirm the bulb itself is not the issue.
Should I switch back to halogen or move to LED instead of HID conversion?
It depends on your housing and your priorities. If glare, reliability, or legality concerns keep coming up, returning to a compliant setup or using a properly engineered projector retrofit is often more predictable, and a lighting specialist can advise based on your exact headlamp design.
If you are in the middle of an HID conversion replacement and want a more straightforward path, consider gathering your bulb type, kit brand, and a few photos of the wiring and dust cap area, then compare against a complete matched kit or ask a shop to confirm fitment before you buy parts again.